Doshii provides a WooCommerce plugin that enables connection between your online store and your POS; making sure that orders from your website can flow directly into your kitchen. Here are the steps to help you get started with the Doshii WooCommerce plugin.
Install the Doshii WooCommerce Plugin
Configure the WooCommerce Plugin
Initialise the Doshii integration
Map your POS menu items to WooCommerce items
Exporting and Importing Products
- Exporting WooCommerce Products
Importing WooCommerce Products
Viewing the status of Order Submission to the POS
Stock Inventory and Item Availability
- Can Doshii update WooCommerce's Stock Inventory and Item Availability?
Install the Doshii WooCommerce Plugin
The plugin can be installed in one of two ways.
Option 1: Install from the WordPress plugin marketplace
Installation of the WooCommerce plugin is performed via your WordPress plugin manager.
- Under Plugins, click on the Add New button and search for Doshii
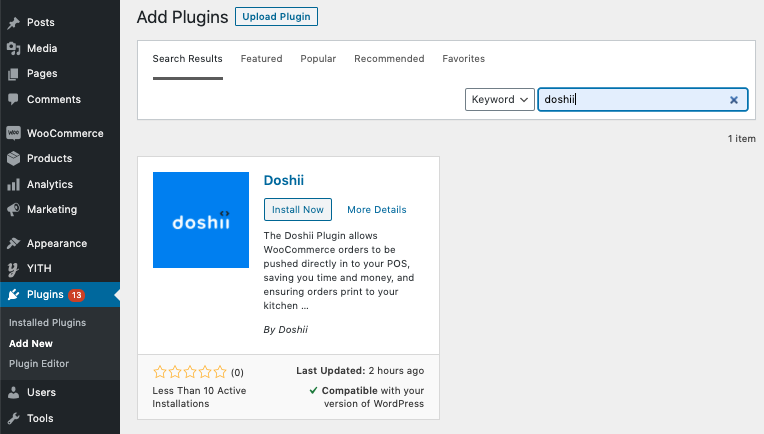
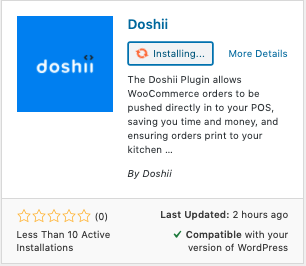
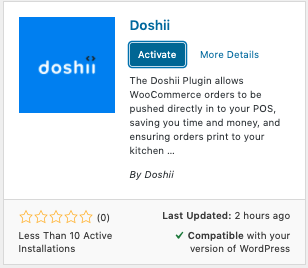
- Click the Install Now button on the Doshii plugin to download, and then Activate once installed
Method 2: Manually upload the Doshii plugin
Installation of the WooCommerce plugin is normal via the WordPress plugin manager.
- Under Plugins, click on the Add New button
- Upload the Plugin installation package provided by Doshii support
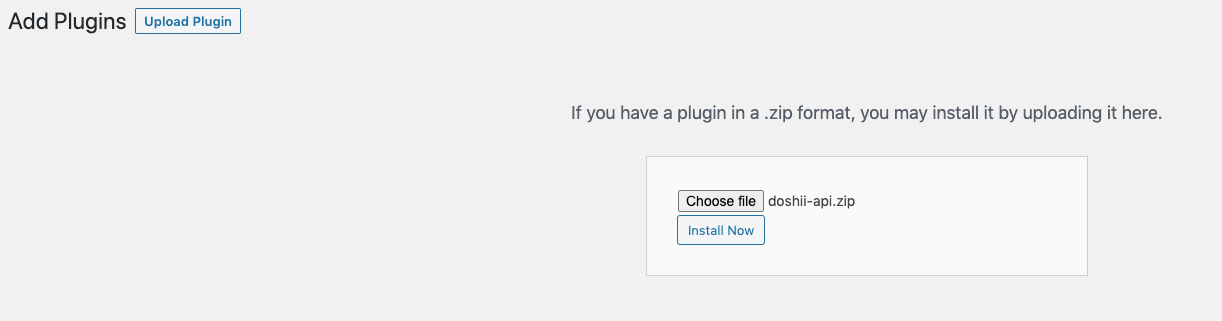
- Click on the 'Install Now' button
- Activate the Plugin
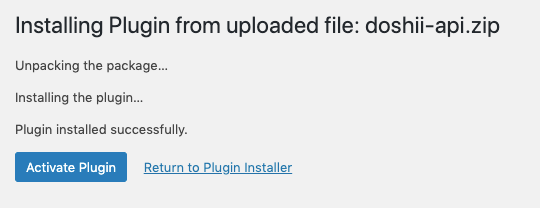
This will complete installation and activation of the WooCommerce plugin.
Configure the WooCommerce Plugin
1. On activating the WooCommerce plugin, under Settings you will now have Doshii Settings. Click on this menu option. On the first tab (Settings), you will need to provide some information to help configure the plugin.
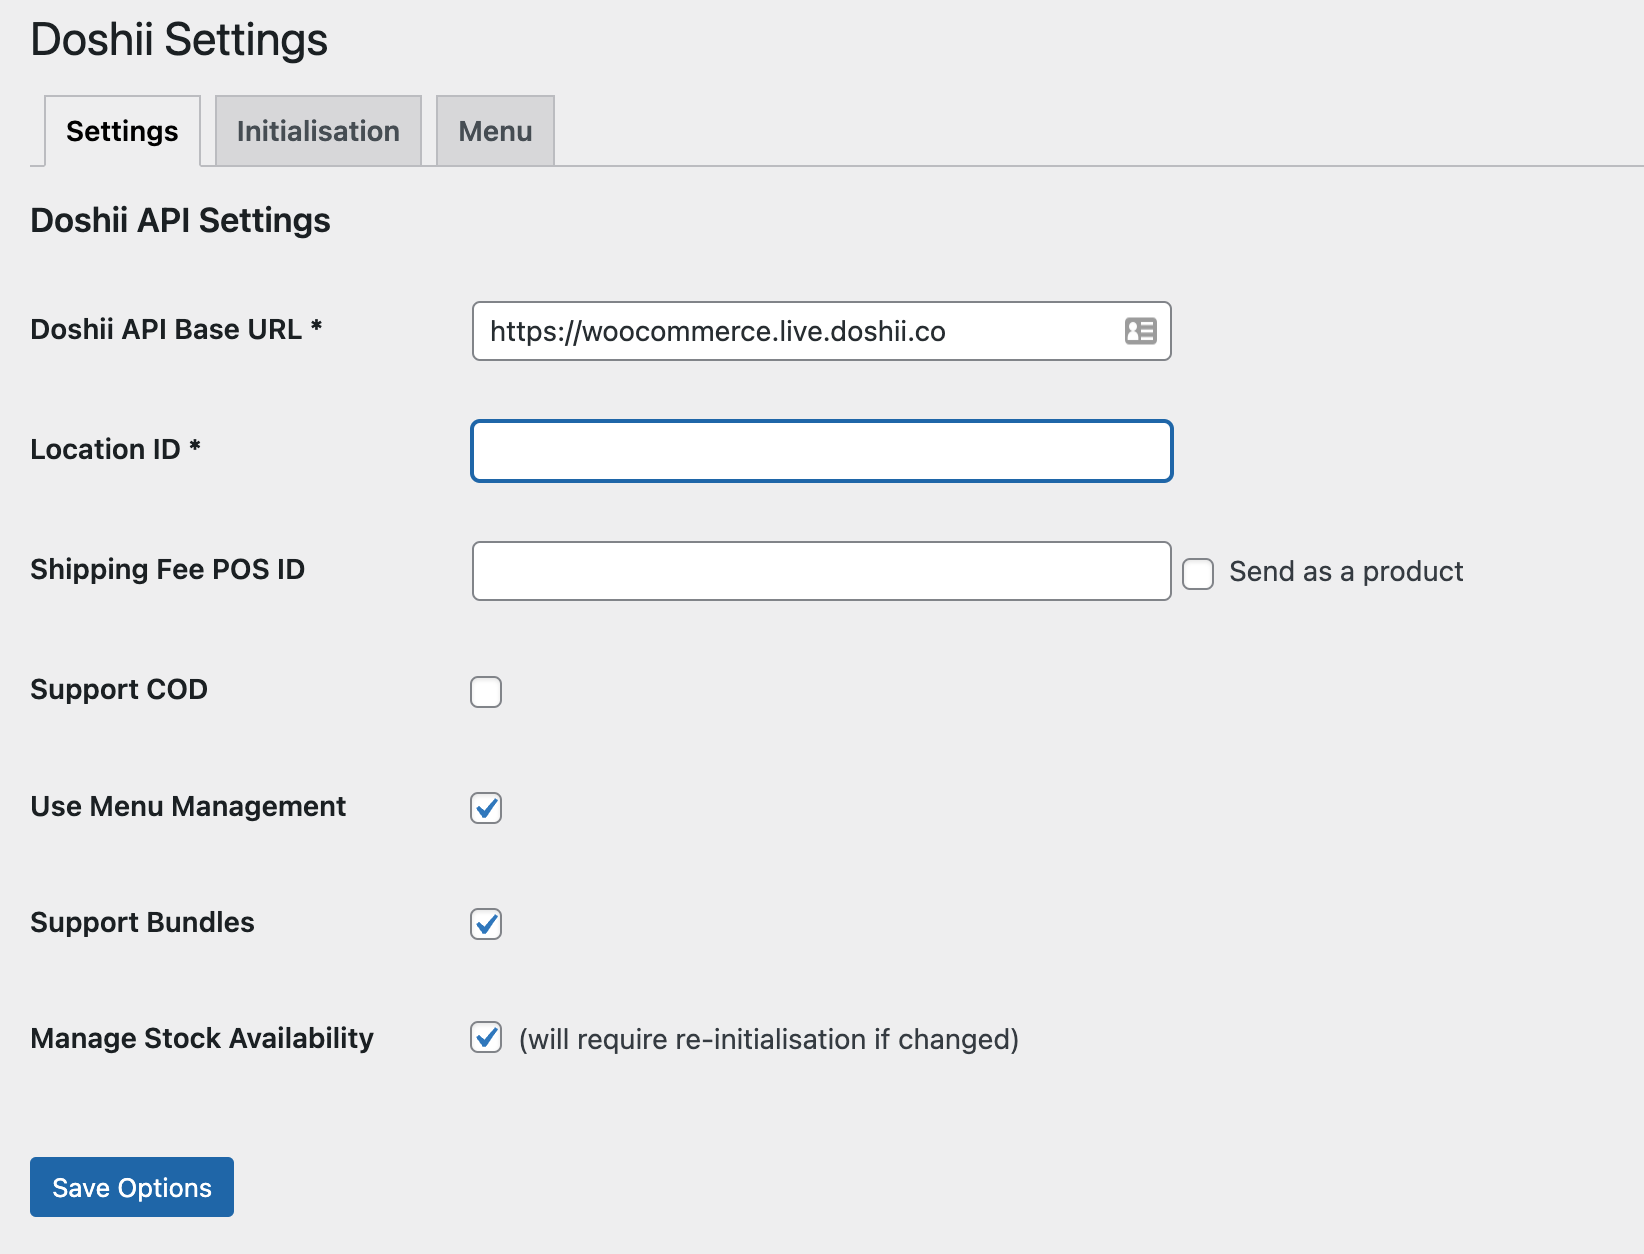
- The Server URL needs to be left as the default https://woocommerce.live.doshii.co unless instructed by Doshii Support.
- Your Location ID will be provided to you by Doshii support.
- If your site has shipping fees, they will be sent through to the POS as uncategorised surcharges. If you would like to map these to a specific surcharge in your Point-Of-Sale, you can specify the POS ID in the Shipping Fee POS ID field.
- There are some Point-Of-Sale that don't support defined surcharges, so it is possible to flag these shipping fees as products (Send as a product) so they can be categorised and reported on correctly within your POS.
- If your site supports Cash On Delivery (COD) then it is recommended to enable the Support COD setting. Otherwise, the plugin will ensure the payment total and order total always match, with the assumption that the order has been fully paid when sent through to the POS. Any differences will be submitted as Order Adjustments.
-
In the event you have an extensive list of POS menu items you may wish to use Doshii's Menu Management functionality to limit the items you import to only the items you wish to sell on WooCommerce. You will need to have access to Doshii Dashboard in order to link items from your POS menu to WooCommerce, and you should review our Support Guide on how to use Menu Management.
If you would like to use Doshii's menu management to only import items you wish to sell with WooCommerce, you should ensure that the Use Menu Management checkbox is ticked. Otherwise, leave this box unchecked.
- If your POS is capable of supporting bundles or meal combos and you wish for your bundled products within WooCommerce to be submitted to your POS as bundles then the Support Bundles setting should be enabled.
- If you POS supports item availability updates with Doshii, you can enable the Manage Stock Availability setting to have this immediately reflected in your WooCommerce site with the product marked as out of stock when your POS considers the item no longer available.
- Click on Save Options once you have entered in the appropriate values.
Initialise the Doshii integration
Once you have updated and saved the details on the first tab, access the Initialisation tab and supply the location token for the venue you are planning to connect (this can be obtained via the Doshii Dashboard or by speaking with Doshii Support). This will initialise the connection between your WooCommerce site and the Doshii platform.
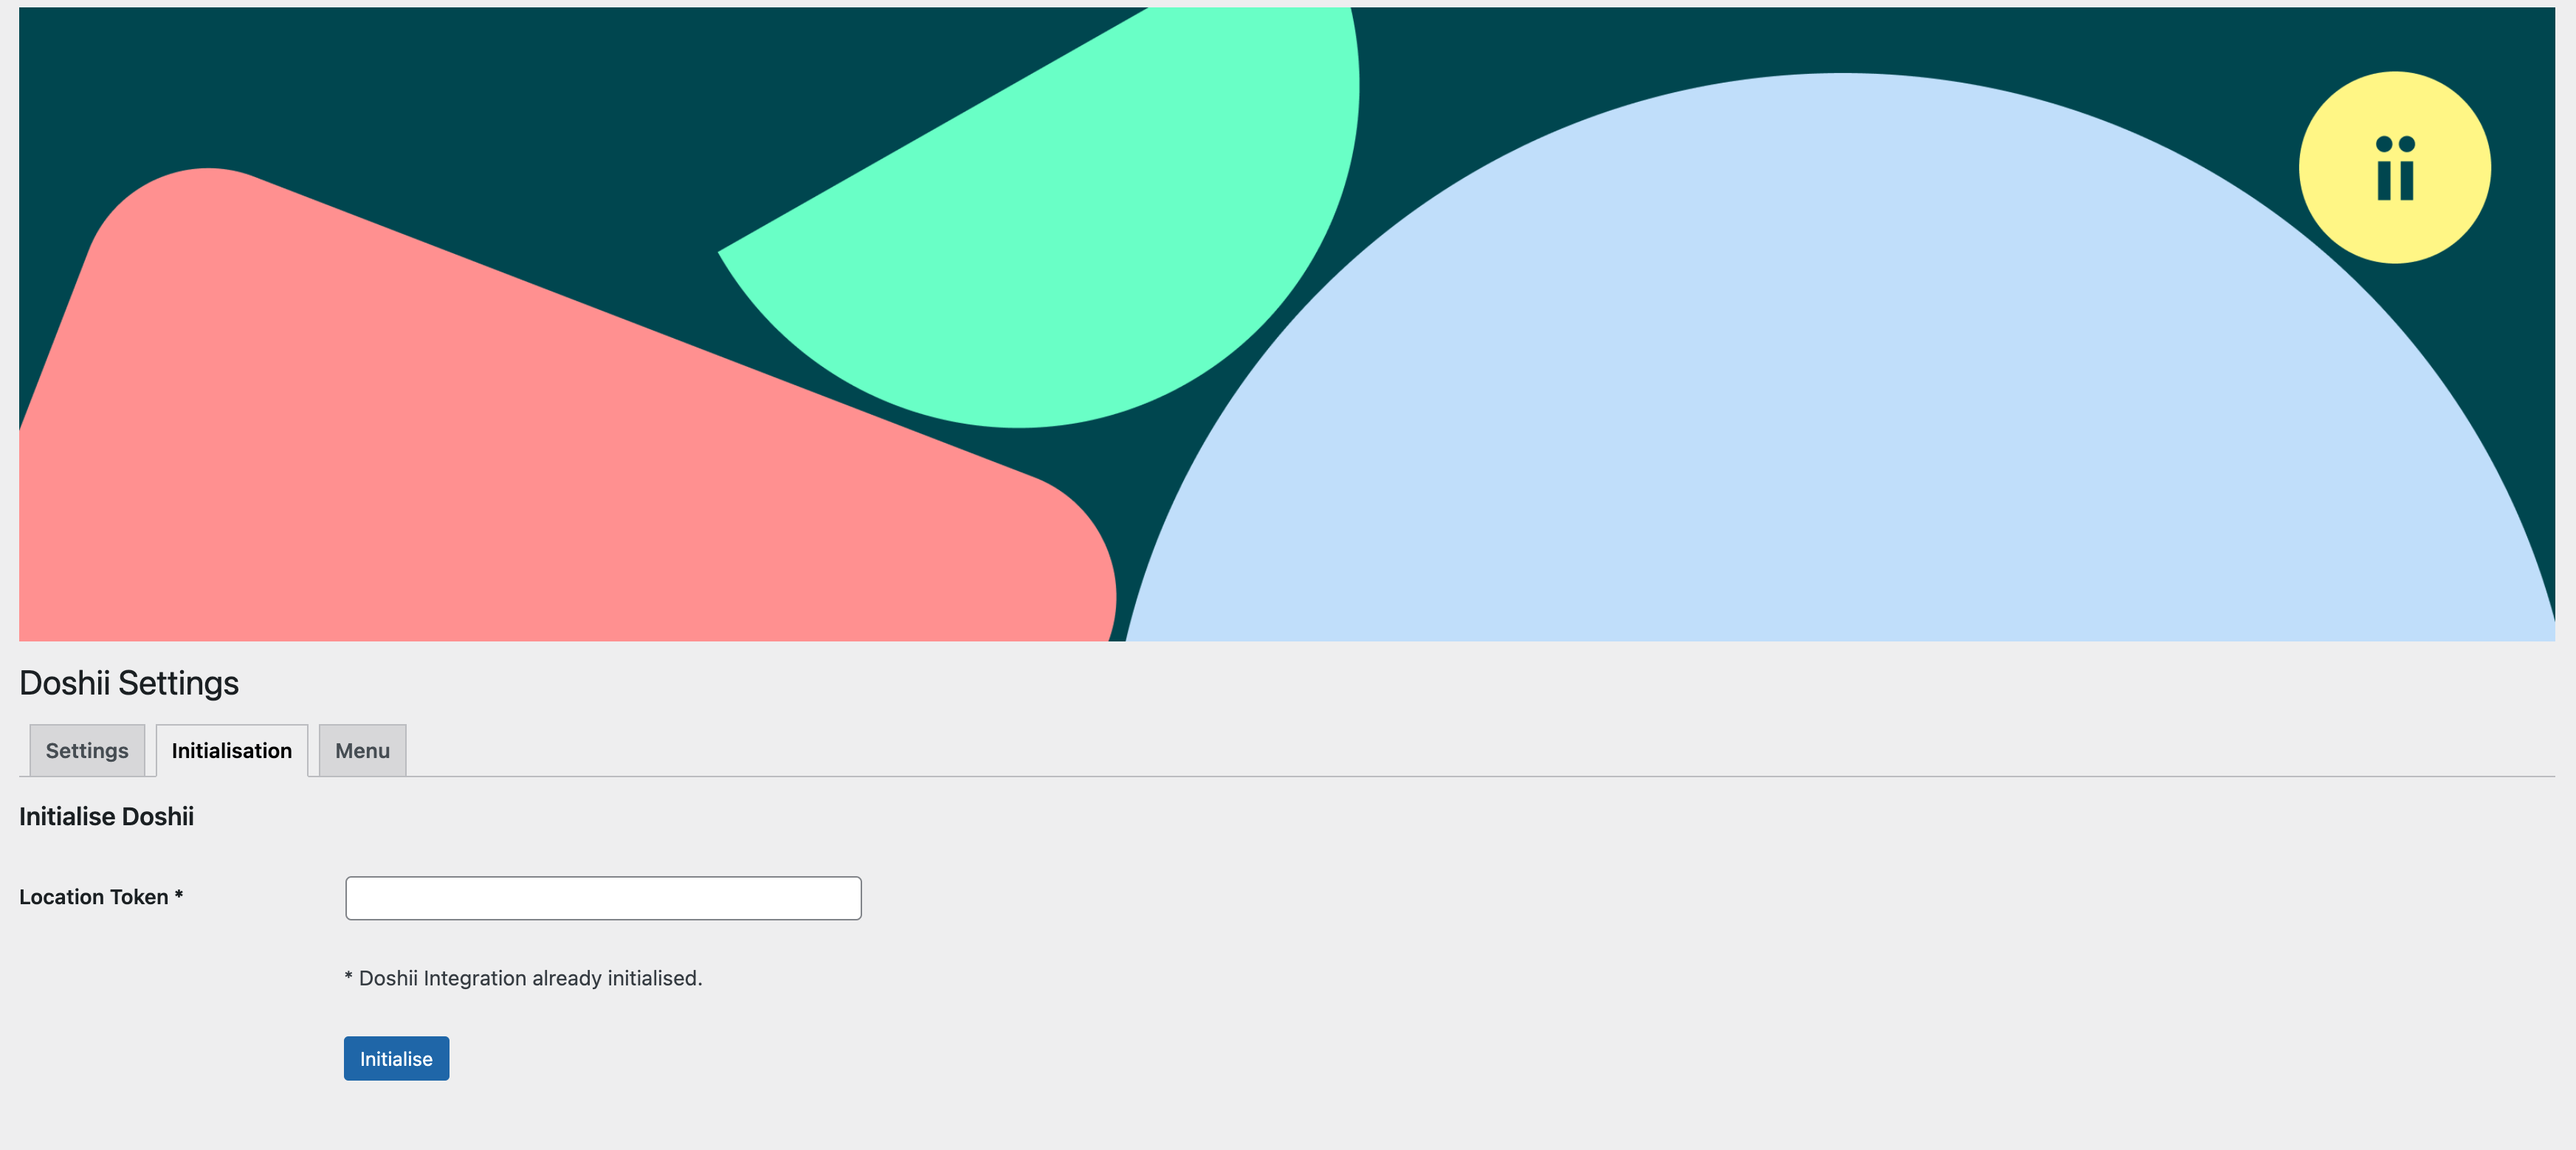
Once the token has been provided, click the Initialise button. A message will be displayed if it is successful, at which point you can then synchronise the menu.
NB: This initialisation step should only need to be done once per installation, after that the plugin will be setup and ready for use.
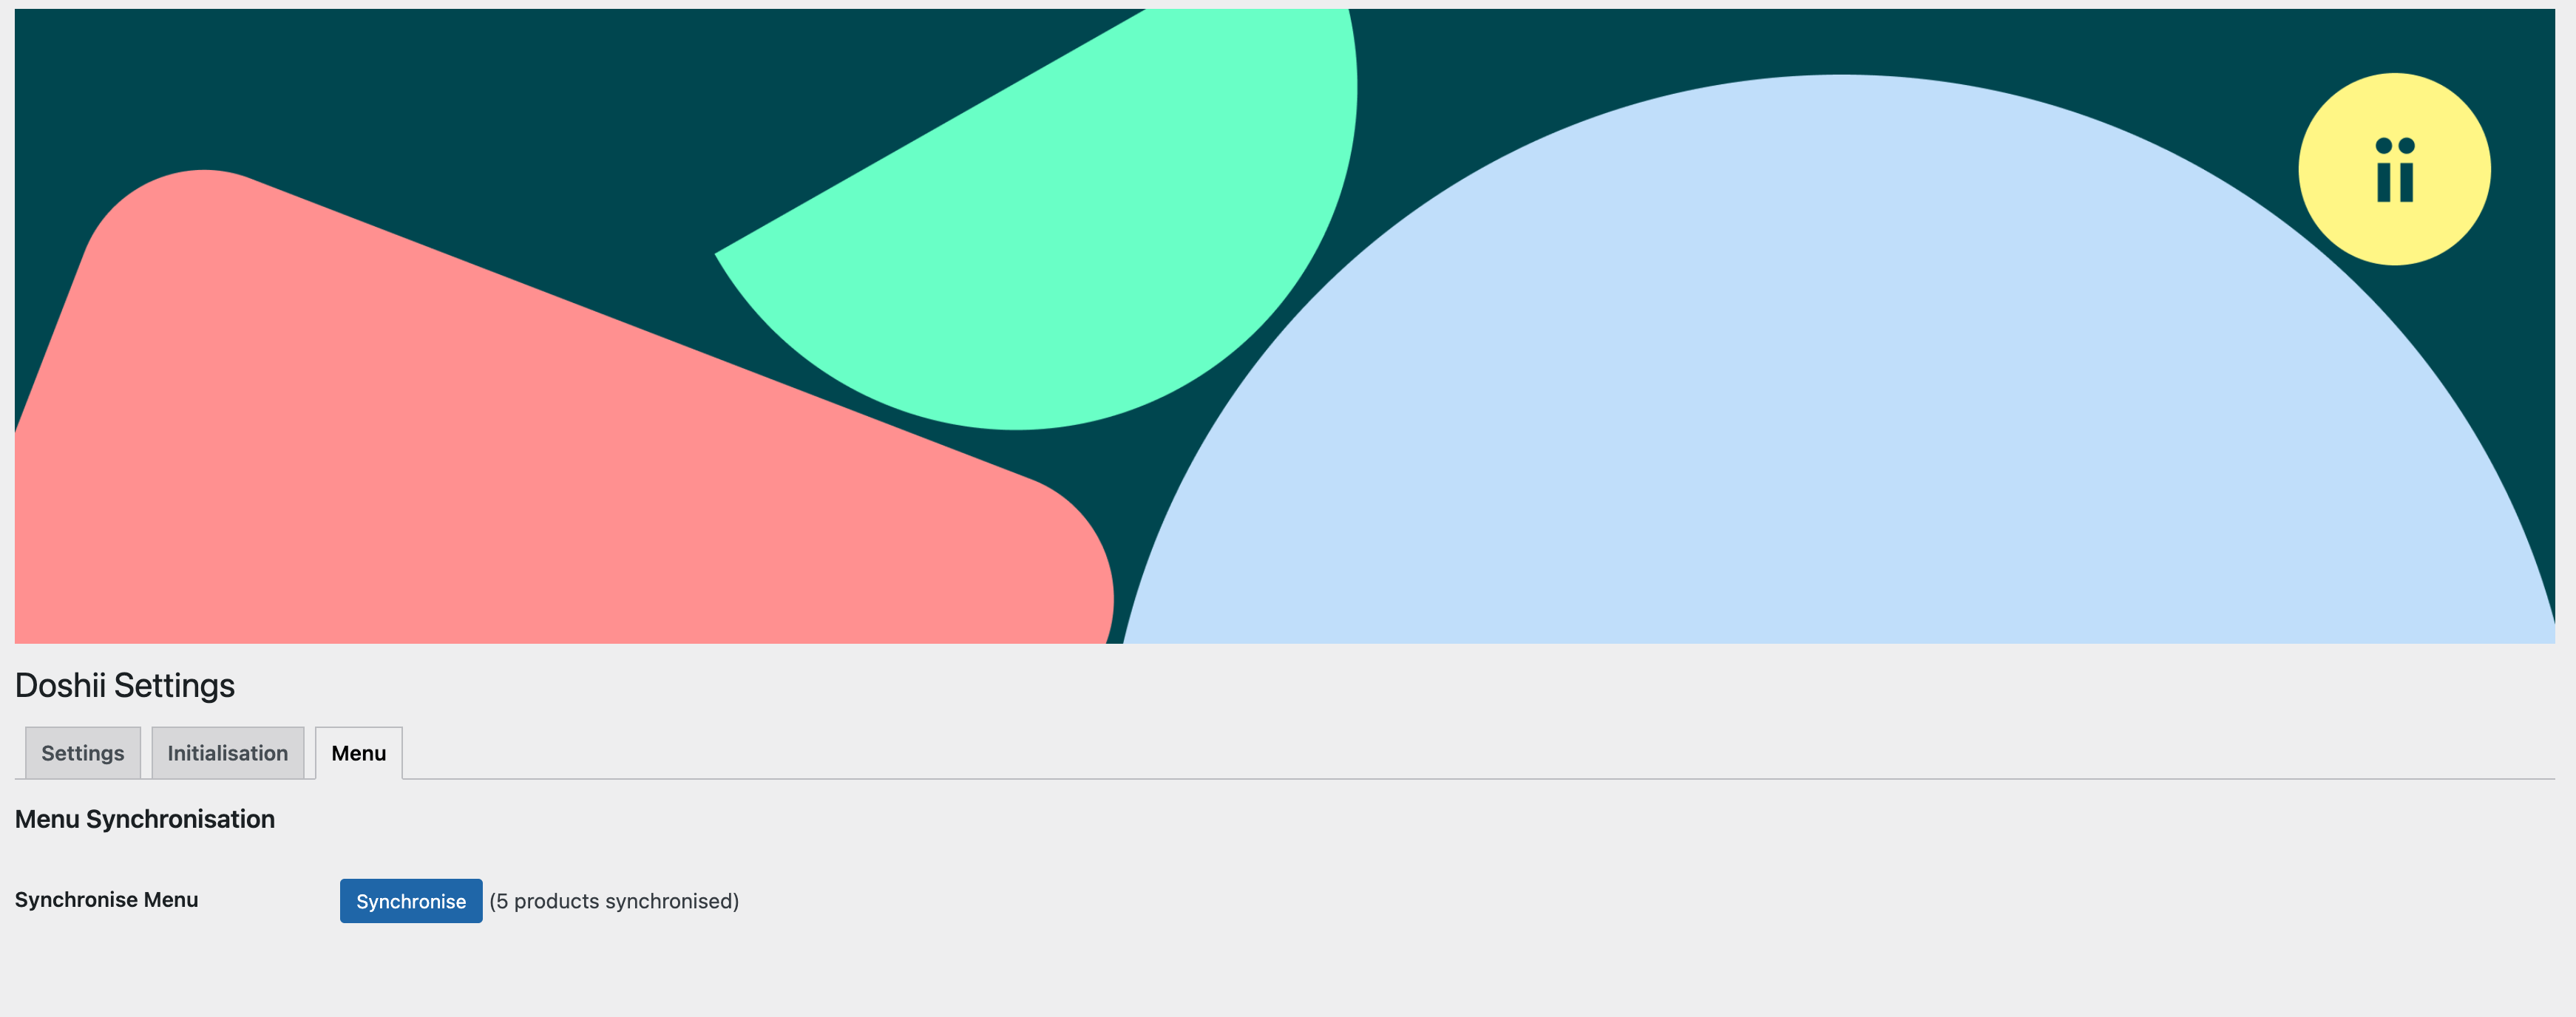
Sync Doshii Menu
After saving the appropriate details and initialising the integration you can proceed to Sync Doshii Products via the Menu tab. Depending on if you ticked Use Menu Management earlier, this will either retrieve from Doshii all of your POS menu items (unchecked) or just the items in your filtered menu (checked). If you are using Menu Management, you will need to have filtered your items prior to completing this Sync Doshii Product step.
Doshii Support is happy to teach you how to filter out unwanted menu items from WooCommerce, just let us know if you need assistance by filling out our support form.
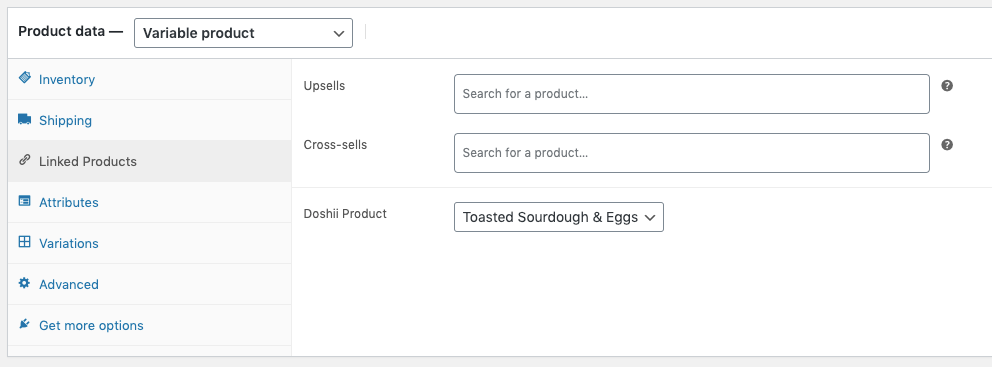
Map your POS menu items to WooCommerce items
On completing the menu sync your POS products will now be available to map against WooCommerce Items. You will need to go through all the menu items you sell in WooCommerce and ensure they have a corresponding POS menu item linked. The linked Doshii menu product is what will be sent to your kitchen printers and your POS when a customer orders the corresponding WooCommerce item.
Simple and Variable Products
For WooCommerce products that are classified as Simple or Variable the linking of a Doshii product item is performed in the same way.
- Select the product from the list.
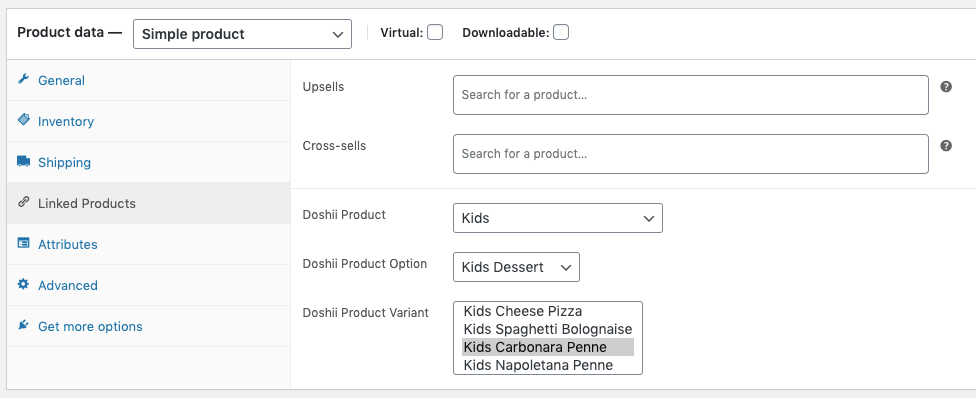
- In the product details page, select on the Linked Products. Here you will see a Doshii Product drop down list.
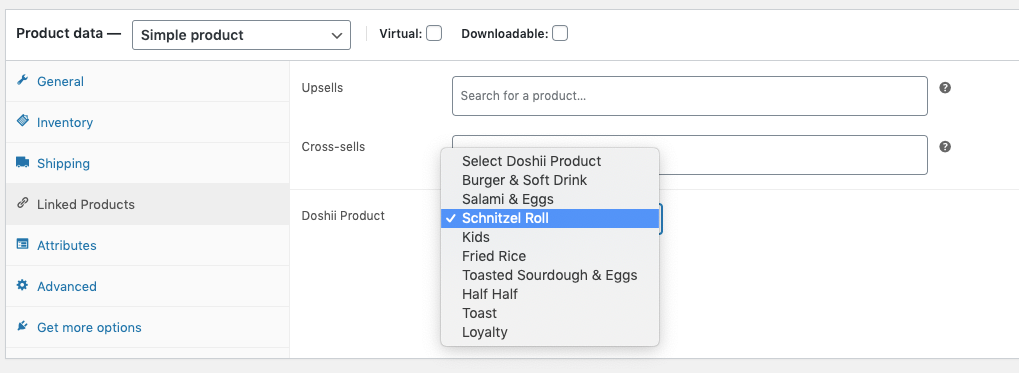
- Select the Doshii item that best matches the WooCommerce product and save.
The WooCommerce product may also translate to a modifier or option in the POS. If so, Doshii provides the ability to map this accordingly by selecting the appropriate option group and option.
Grouped Products
Doshii presently does not support products in WooCommerce that are defined as a Grouped Product.
Exporting and Importing Products
The Doshii plugin supports exporting and importing WooCommerce products for bulk editing of the Doshii Product Map.
Exporting WooCommerce Products
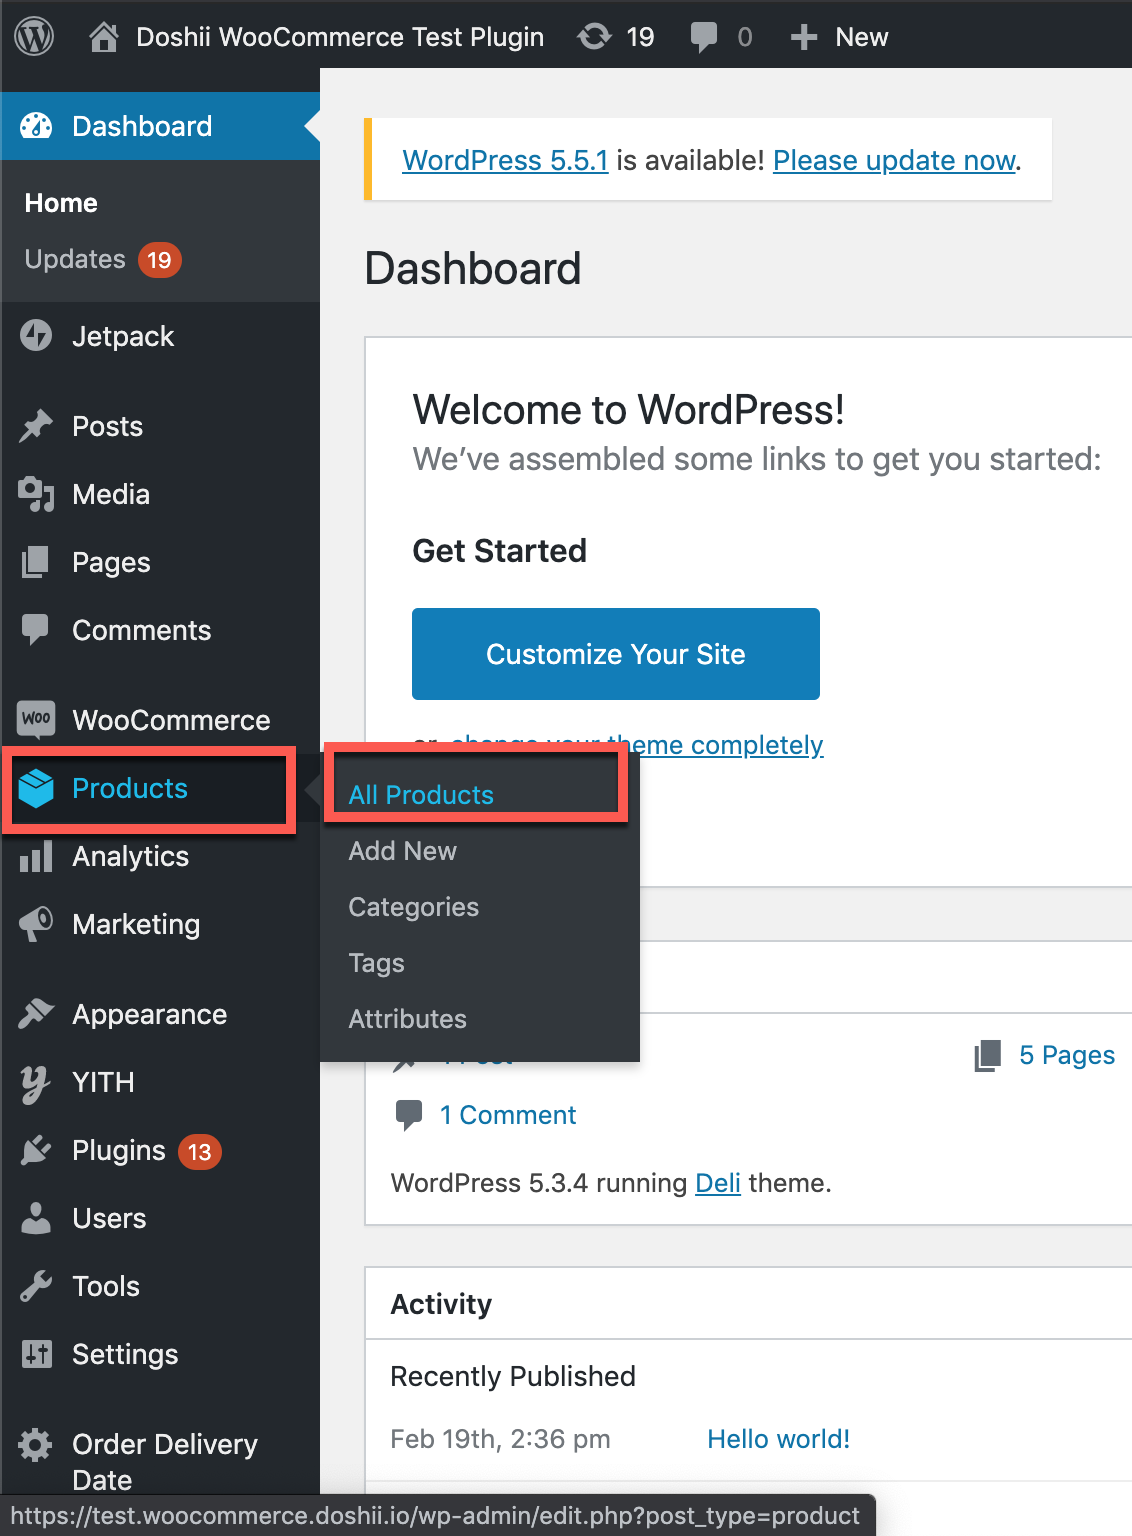
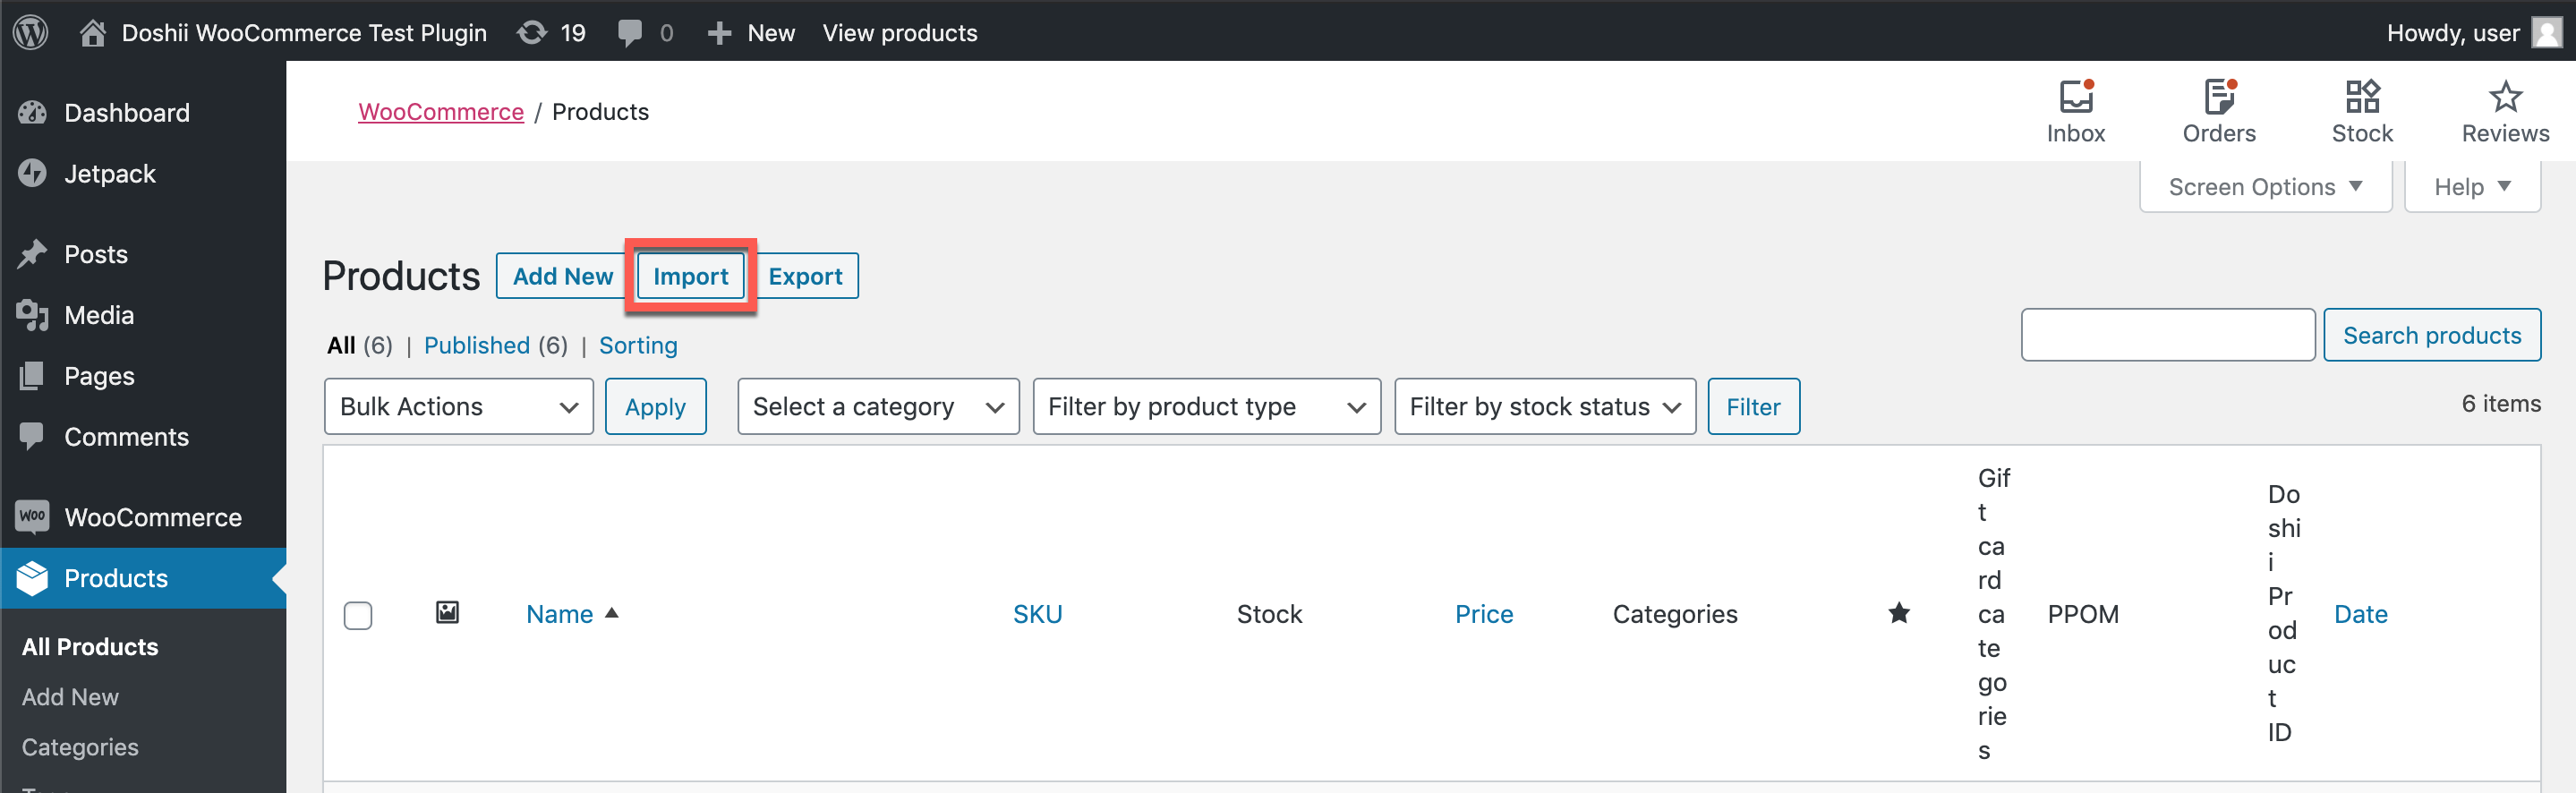
- Login to your WooCommerce Admin console. Click on Products -> All Products
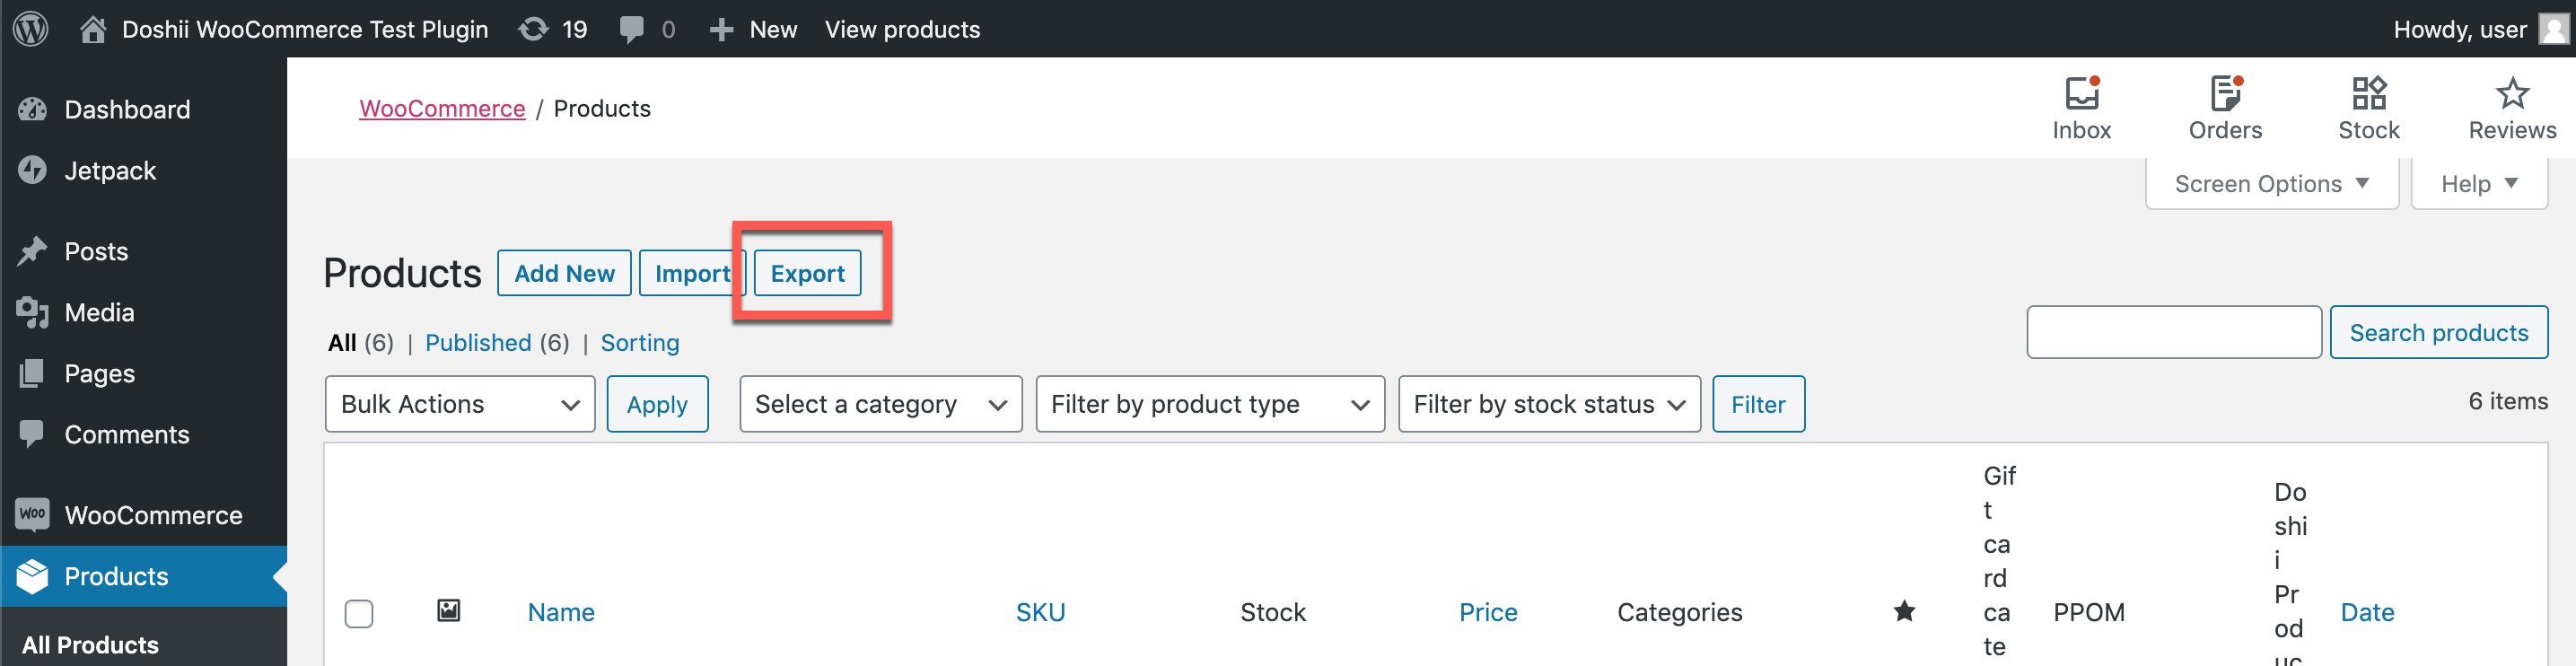
- On the Products page, click on the Export button.
- On the Export page:
- Under 'Which columns should be exported?' select columns 'ID', 'SKU','Short Description', 'Product Description' and 'Doshii Product Map'. If it will help you to distinguish between your products, it may be useful to also include price columns. For the Doshii Product Map column to be available, ensure the Doshii plugin is enabled.
- Under 'Which product types should be exported' select 'Simple product' and 'Variable product'. Doshii cannot support other product types.
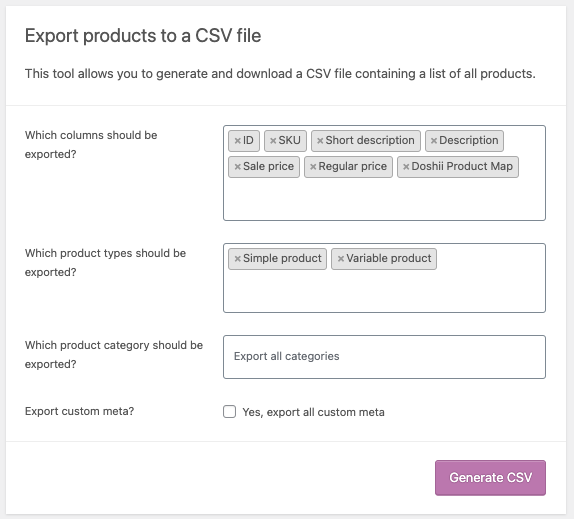
Click on the Generate CSV button. This will download a CSV file of your WooCommerce products.
Mapping WooCommerce Products
Use your POS to locate the POSID for each WooCommerce product. This should be entered into the Doshii Product Map column in the CSV you exported.

If you need help, Doshii Support can teach you how to locate your POSIDs and add them to this CSV file.
Importing WooCommerce Products
To import the WooCommerce product CSV with the Doshii Product Map column filled out, follow these steps:
- Login to your Woocommerce Admin console. Click on Products -> All Products
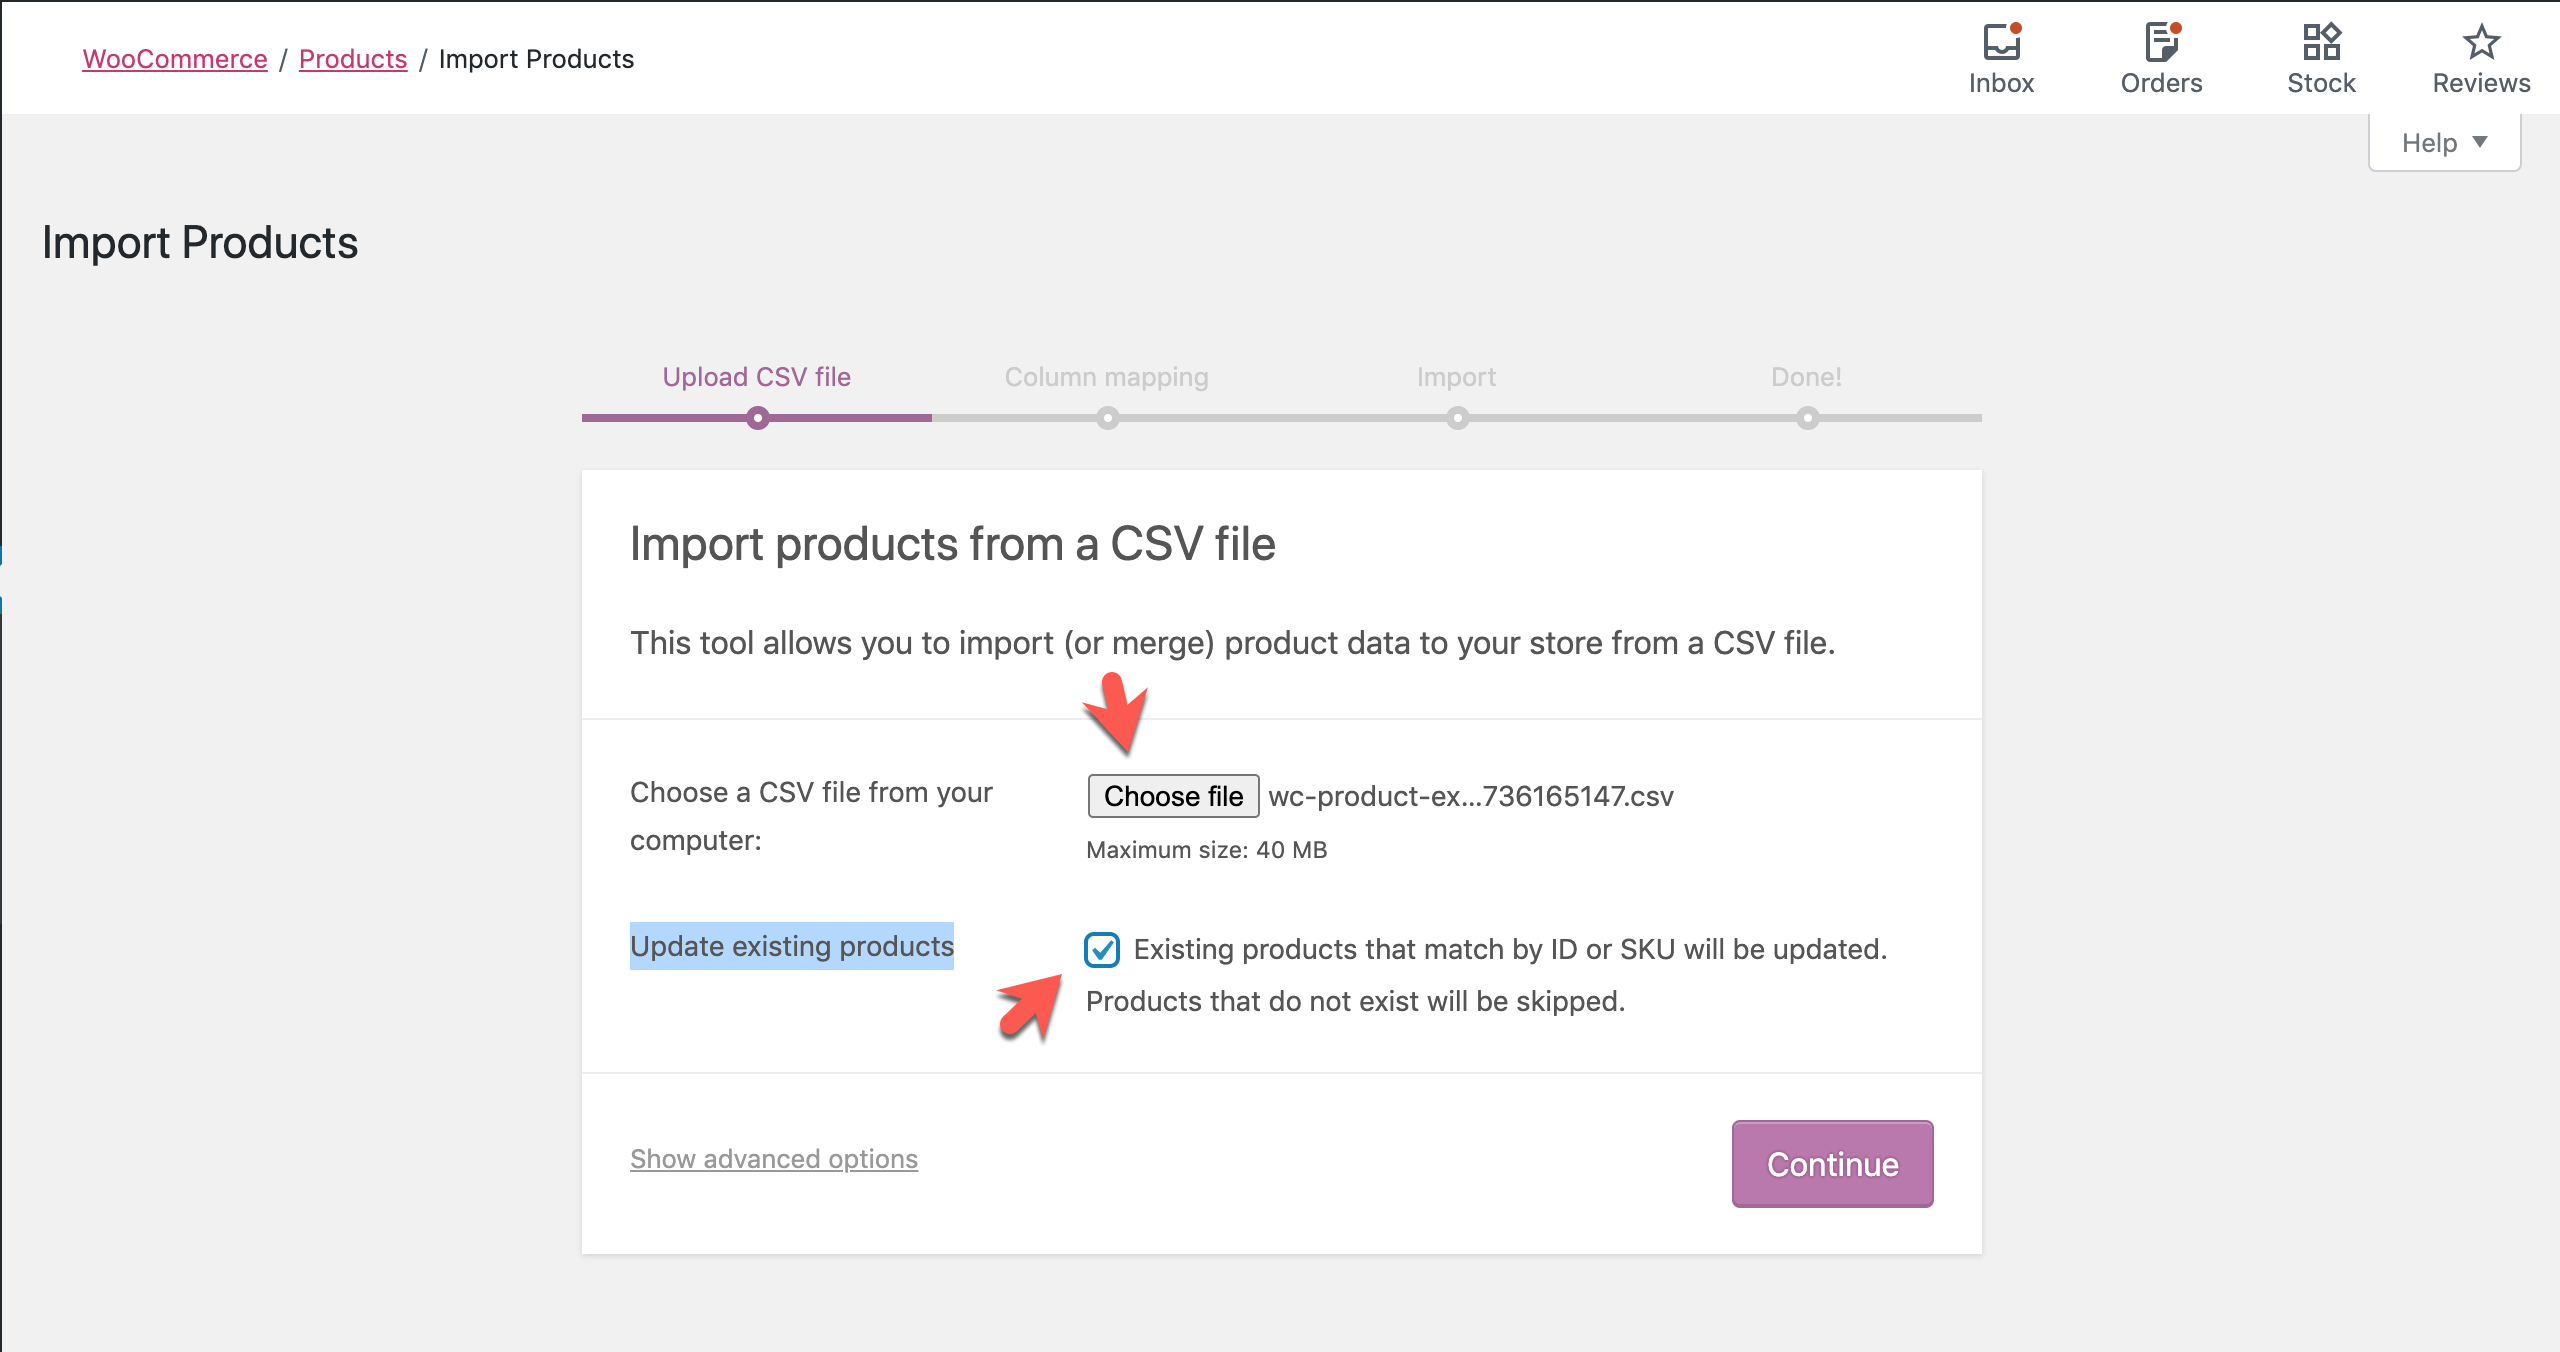
- On the Products page, click on the Import button.
- On the Import Products page upload the CSV to import, and ensure Update existing products is checked. Press the Continue button.
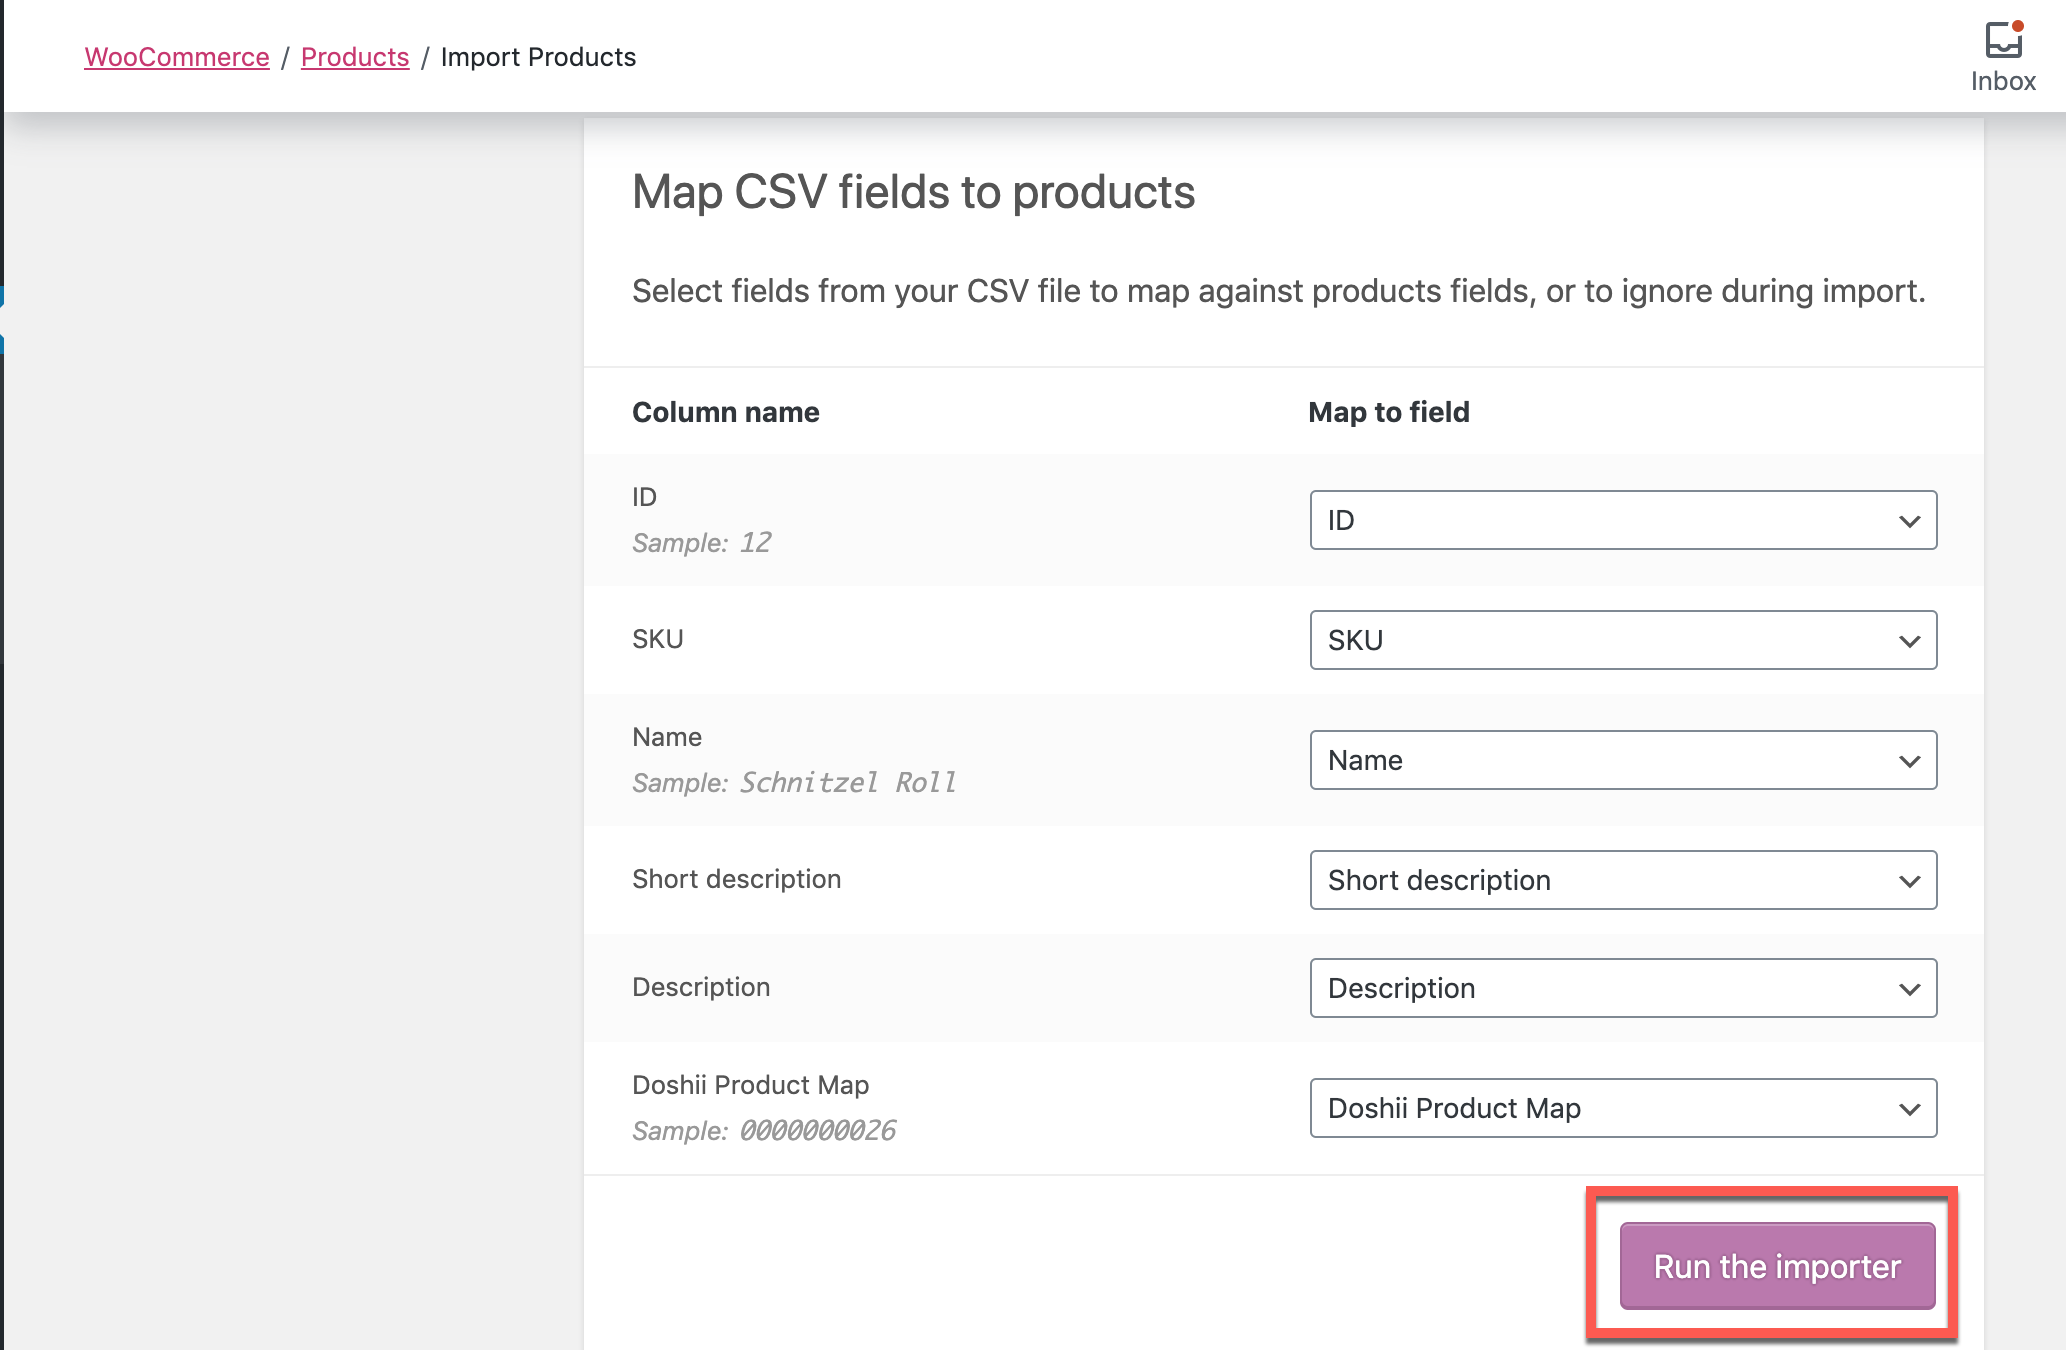
- Ensure the Column names are mapped to the correct WooCommerce product columns. Click on the Run the Importer button.
- The Importer will alert you to how many products were updated and imported.
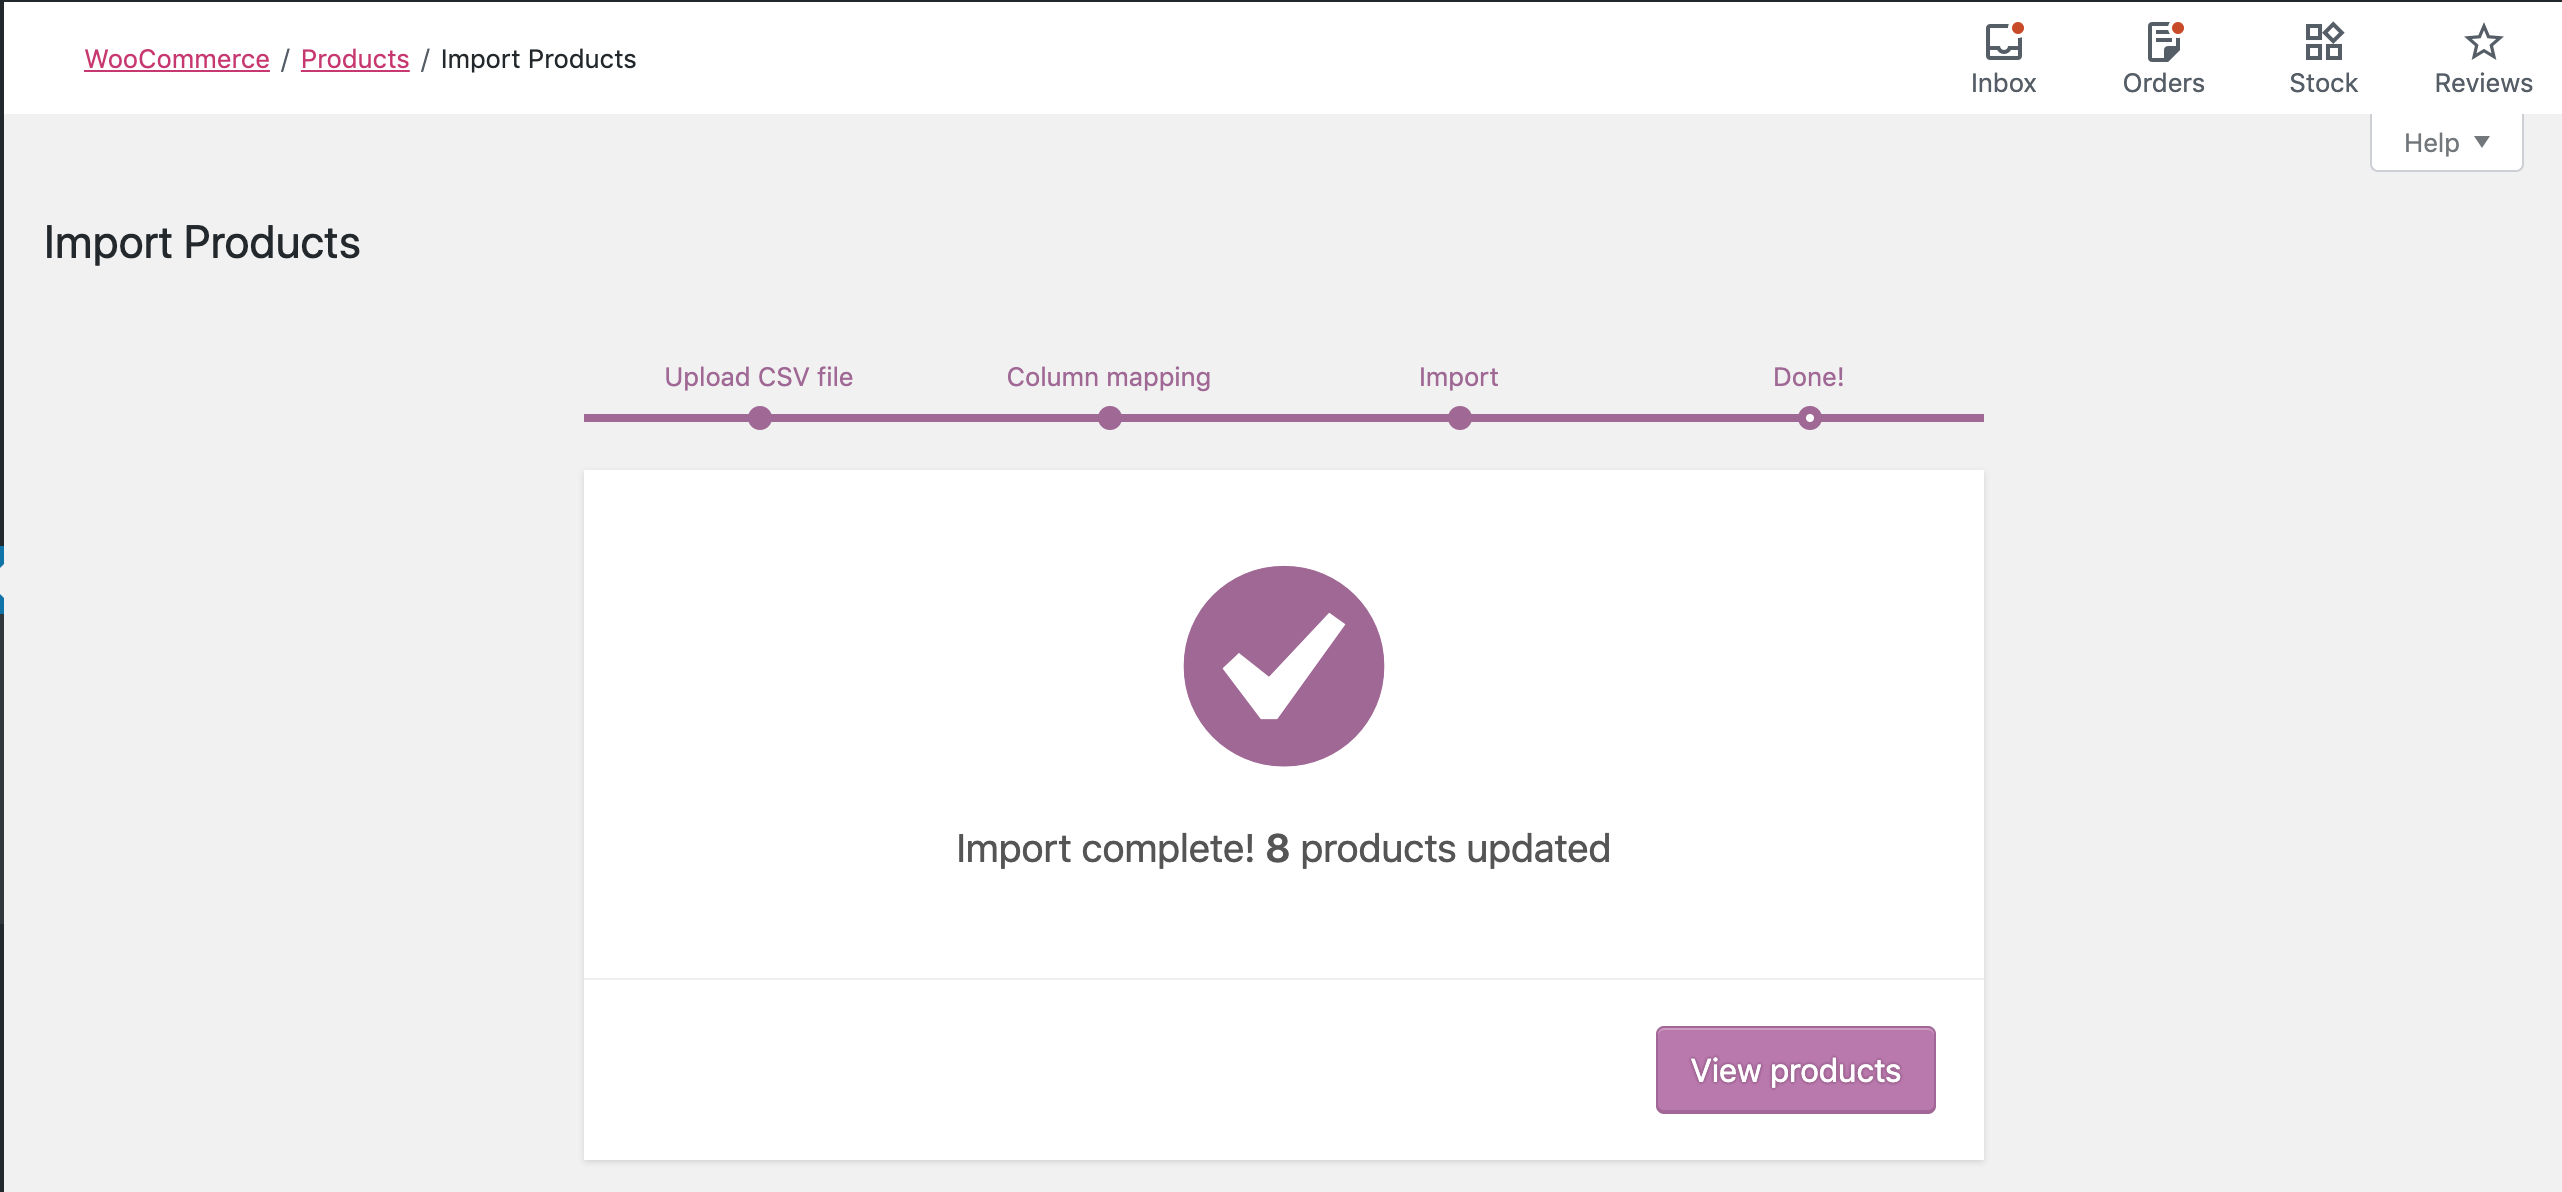
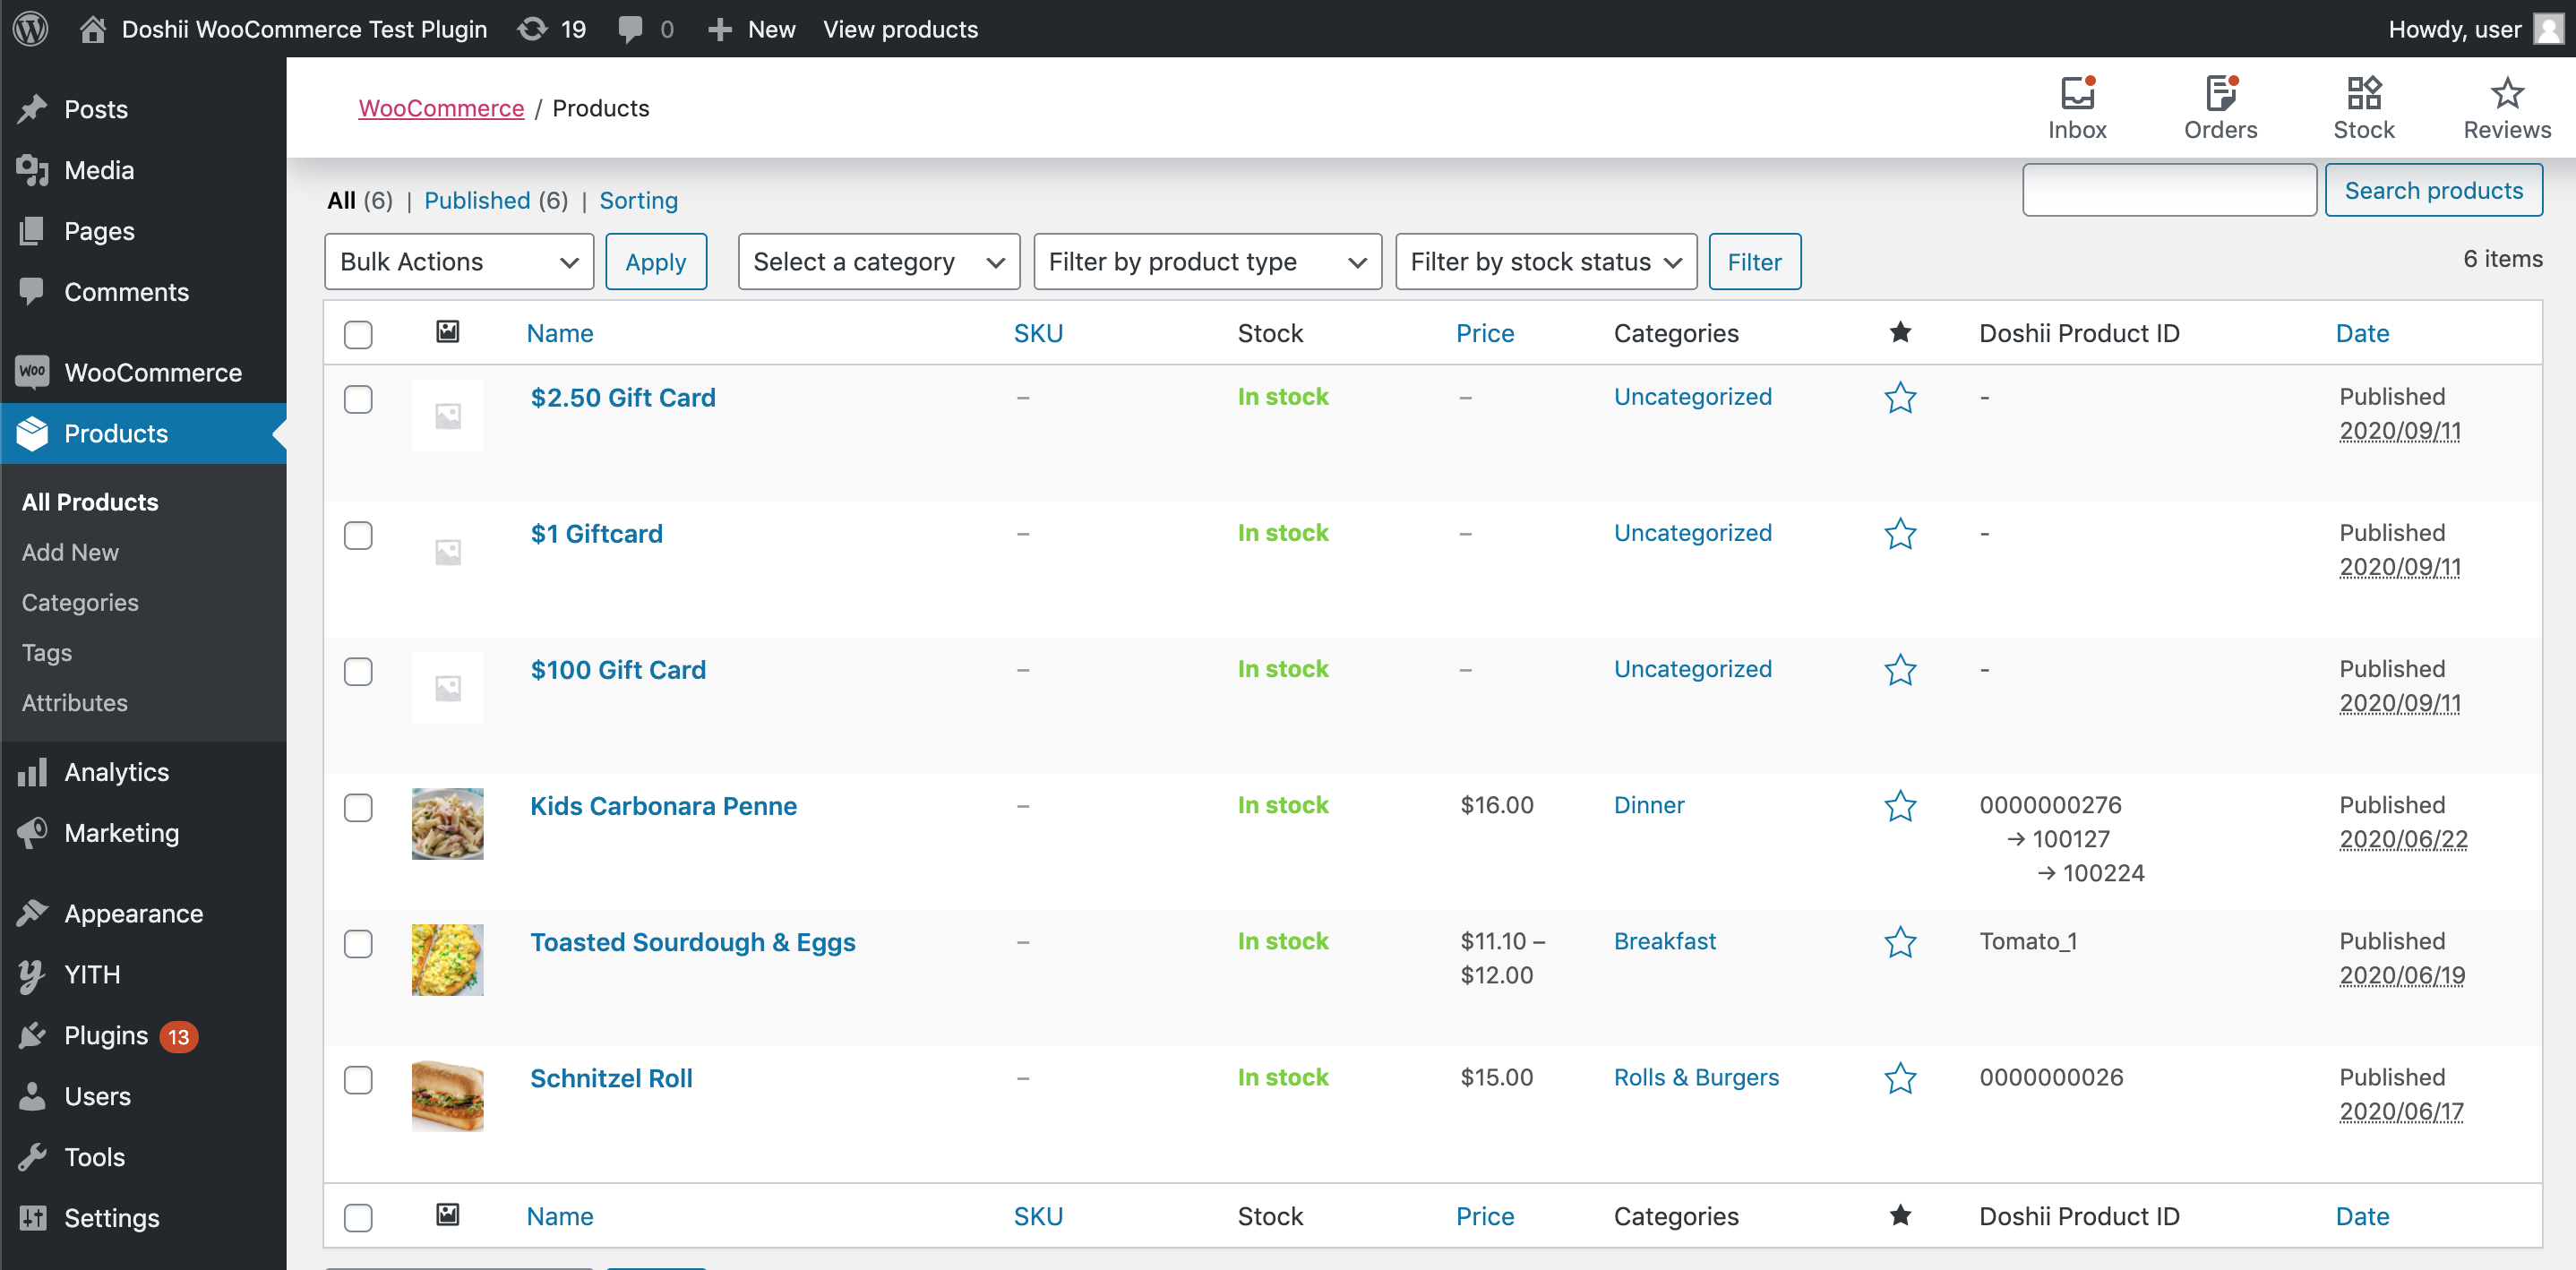
- Once the Import is complete you will note on the Products page the Doshii Product Id column has the item Ids imported.
Viewing the status of Order Submission to the POS
Once the Doshii integration plugin has been enabled and products are mapped, orders submitted in WooCommerce will begin to flow directly to the POS at your venue. This will be transparent to the customer workflow, and if the integration fails for any particular reason the customer order will still proceed. If for some reason the order hasn't reached your POS, in order to check integration status you can use the WooCommerce orders screen.
Stock Inventory and Item Availability
Can Doshii update WooCommerce's Stock Inventory and Item Availability?
The Doshii plugin can provide a two way connection to your Point of Sale. This ensures when orders are submitted by customers, they flow directly into your POS and kitchen printers. Since the Doshii plugin can map your POS items to your WooCommerce products, stock levels in the POS are automatically maintained as orders are submitted.
However, inventory levels and stock availability is only partially supported between your POS and WooCommerce. Doshii will push stock availability to WooCommerce if you are using Doshii's menu management platform to manage your menu or your POS has item availability integrated with Doshii. If neither of these options are available to you, this means Doshii can not provide updates to WooCommerce stock availability and this will need to be managed manually.
In all cases, Doshii is unable to manage stock counts within your WooCommerce site, only stock availability.