In-venue ordering provides great convenience to the customer and productivity and efficiency to the venue. However, for the venue to realise these gains integration plays a significant part. In-venue ordering has the potential for thousands of orders to flow from the customer to the kitchen. Without integration the venue needs to manually key each of these into their POS, to ensure the chefs know what to cook, inventory systems know what to order and accounting systems know the daily takings. Luckily, the Doshii Ordering API helps you setup integration in 3 easy steps; as well as offering additional functionality if you need. Here is how you can setup a straight forward integration between your App and the POS, using Doshii's Ordering API.
Step 1: Implement Doshii connection and onboarding
- Retrieving table Information
- Keep updated when tables are updated/modified
- Keep updated when menu changes occur
- Deciding not to implement Doshii Menu API
Step 2: Check-in customer and send an order
- Items
- Why can an order be rejected?
- How should I handle an order rejection?
- Use Doshii health endpoint to verify venue is connected and available
- Cancel orders and payments that remain in pending for an amount of time
More complex In-Venue Ordering
Step 1: Implement Doshii connection and onboarding
If you haven't already, take a read of the Connecting and Onboarding a venue. Before any order can be submitted to Doshii, you must have authenticated with Doshii, and subscribed to the venue, using the venue's Doshii Location ID. This is your passkey to be able to send orders to the venue's POS. Subscription can be performed using the Doshii Dashboard, or using the Doshii API. Additionally, you need to consider whether to retrieve table information from Doshii and menu information.
Retrieving table Information
Regardless of how your App selects to identify the location of a customer, the venue is going to need to also know this information, in order to bring out the ordered food and drinks. In order to achieve this you may wish to retrieve from Doshii the table metadata for a venue, and use the same table layout in your App as the venue has.
To retrieve table information, issue a GET request to the ~/tables endpoint. Click here to simulate. You should always use Accept-Encoding: gzip.
Keep updated when tables are updated/modified
In order to stay updated when tables are modified or new tables are created in Doshii, you will need to register a Webhook (or use Websockets) for these events:
Retrieving menu information
Doshii maintains the venue's menu from the POS, which is accessible using the location menu endpoint. We also provide a digital menu management platform which enables both you and your venue customers to curate their menu within Doshii, and then retrieve this App version of the menu, still keeping fields, such as the menu price for an item, in sync with the Point of Sale. You can read about the Digital Menu Management platform here.
Using Doshii to manage the menu can significantly reduce your development time. Additionally, it gives the venue control to decide what they wish to sell and link up items as they commonly know in their POS to your App.
To use Doshii's Menu Management within your App all that is needed is to use the filtered parameter on the location menu endpoint.
Keep updated when menu changes occur
In order to stay updated when menu items are modified or new items/modifiers are created in Doshii, you will need to register a Webhook (or use Websockets) for these events:
Upon App Menu Updated (using Digital Menu Management)
Upon App Menu Item Updated (using Digital Menu Management)
Deciding not to implement Doshii Menu API
In any integration, typically the hardest part of the setup is to configure an integrated menu. Additionally, future changes by the venue in your App must ensure to keep the menu integrated, otherwise orders will fail. As a result, Doshii does not recommend to skip the implementation of the Doshii Menu API. This is also generally part of any certification, so please speak with the Doshii team if you have reason to not implement the Doshii Menu API.
Step 2: Check-in customer and send an order
While the Doshii Ordering API is very flexible, and allows for a multitude of different ways to submit and update orders, let's focus on the most straight forward implementation: Pre-paid order at table. The typical flow is:
- Customer arrives at the restaurant and opens up the App's menu
- Customer selects their items and proceeds to pay
- App processes the payment.
- App checks the customer in against the table they are sitting on, and sends the order and the prepaid payment to the POS via Doshii.
- POS accepts the order.
- The App confirms the acceptance of the order.
- POS additionally updates the order as complete, as payment has been made and no further changes to the order are allowed.
The following sequence diagram generally explains the steps involved to successfully submit a In-Venue Order to Doshii, and have it accepted by the POS.
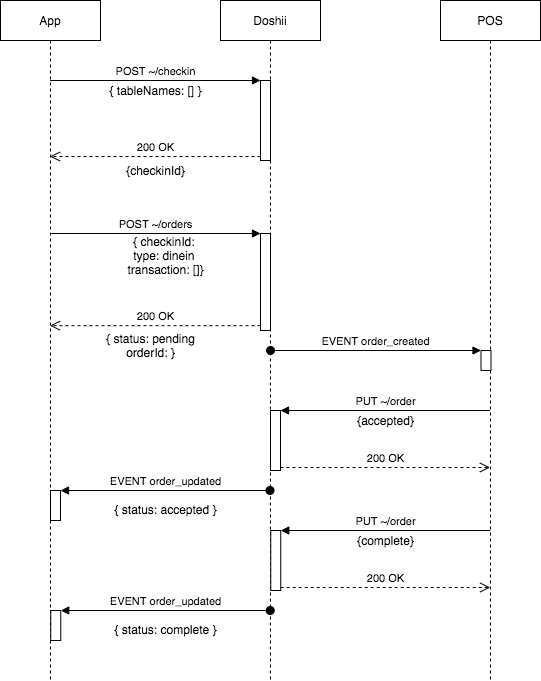
Create a Checkin
A table checkin is used to tell Doshii which table the customer has been seated at. This will be forwarded to the POS. Doshii will only validate the table against metadata if the checkTables parameter is used. Otherwise, the table submitted will be sent to the POS without any further validations. Always aim to use numeric table names if your App uses its own.
It is up to the POS on how to handle the table information. If the table used exists within the POS, and table management is supported, then the table will be seated. If the table does not exist, or table management is not a supported feature, the POS may display the table used on kitchen dockets and bump screens.
On submitting a checkin, Doshii will respond with the checkinId. Use this in your order submissions to link the orders to the table. Multiple orders can be linked to a checkin.
Submit the Order
Now it's time to submit the order, using the orders endpoint. Some important properties to use
- checkinId: the checkinId provided by Doshii in previous step
- type: the order should be a 'dinein' order.
- externalOrderRef: your App's order reference number. This is helpful to quickly display order information in the Doshii Dashboard, and for troubleshooting.
- transactions: Submit the payment transaction with the order
- transactions.prepaid: true. This will ensure the POS knows the order has already been paid for.
- transactions.reference: the reference for the payment. This is helpful for support teams to troubleshoot.
- transactions.method: Pass through the type of payment method used. This is used for tender type by the POS, and for POS reporting.
- consumer.name and consumer.phone: Some POS require this information for dine in information.
Items
When submitting items, the most important property is the posId. This is the internal ID the POS uses to identify the item in its menu. While Doshii supports not submitting a posId, it is not recommended. Not submitting a posId for an item will result in the item being accepted by the POS, but only printed on dockets as a label; this means integrated stock control systems would not know about the item ordered, and other reporting in the POS will not work as intended.
It is also important to remember that items cannot be used as variants or vice versa. Variants against an item also have a posId, but the POS generally will keep variants in a different menu directory.
unitPrice, totalBeforeSurcounts and totalAfterSurcounts: Have a read of our article explaining how to calculate totalAfterSurcounts.
Surcounts
Surcounts is a Doshii terminology for discounts or surcharges. These can occur on a transaction, order or a specific item. Have a read of our article explaining surcounts.
Confirm order acceptance
Doshii order submission and state machine is 100% asynchronous. When you submit an order to Doshii, the HTTP 200 response you will receive will only confirm that Doshii has received your order. At this time, Doshii notifies the POS, who will process your order and either accept or reject. The POS will then update Doshii of its result, and Doshii will notify you.
To receive notification of the POS decision you need to register a webhook (or websocket) to listen for the EVENT order_updated.
The POS will additionally complete the order as payment has been received. A subsequent notification will be issued by Doshii to your App once this occurs.
Why can an order be rejected?
An order rejection generally occurs due to some configuration issue. This can be:
- The item's posID supplied does not exist. Either it has been removed from the POS, or perhaps a variant posId has been used, or an item has been submitted as single type when it should be a bundle. Typically, using Doshii's menu API will reduce the possibility of an order being rejected by the POS.
- Consumer details have not been provided.
- A table used in the checkin was not numeric (a requirement on some POS).
- The total payment amount is not the same as the order amount. POS will accept App pricing for items, however they typically expect prepaid orders to have exact payment.
How should I handle an order rejection?
Doshii does not mandate how to handle an order rejection. Some Apps decide to continue, as the customer has made payment and refund is not possible. Other Apps will reverse the payment and advise the customer of an issue.
How to handle an order rejection depends heavily on your own CX. The Doshii team can always offer suggestions, just ask us! One thing to always keep in mind: in the event of an order rejection, the POS will NOT display or print the order to the venue.
Step 3: Additional advice Use Doshii health endpoint to verify venue is connected and available
All legacy POS systems are physical servers at the venue, and rely on an internet connection to exist in order for Doshii to connect and communicate. As such, sometimes issues can occur and the venue may become offline. In the event of this, orders will not flow to the POS, and will remain in a pending state. Customers would believe their orders are on their way, but the kitchen has no idea the order needs to be prepared.
To mitigate against this we suggest to periodically check the Venue's health using the location health endpoint. The following is an example response:
{
 "locationId": "4rnQ0h7r4",
 "name": "Doshii",
 "heartbeat": "2020-05-07T16:09:46.970Z",
 "status": "active",
 "locationUri": "https://sandbox.doshii.co/partner/v3/locations/4rnQ0h7r4"
}
The heartbeat timestamp informs you the last time Doshii had a connection with the venue. If this timestamp is older than 2 minutes then a problem may exist.
Cancel orders and payments that remain in pending for an amount of time
In the event of connectivity issues with the POS, orders will remain in a pending state. They will be picked up by the POS upon the first successful connection. However, in the event of issues that may take an extended period of time to fix, having an order accepted may not be desired. As such, you should cancel orders after a specified time. Typically, Doshii orders are accepted by the POS within 5 seconds of submission. However, it is up to you to specify the time to wait before cancelling, as this has to be in line with your CX.
Ensure to cancel both the order and any payments.
More complex In-Venue Ordering
The Doshii Ordering API supports the ability to submit more complex in-venue ordering. You can:
- Submit an order and pay later.
- Submit an order and ask the customer to pay the venue directly. Receive the payment information from the POS.
- Submit an order and append items to it at a later stage.
- Receive updates to the order from the POS.
For these complex scenarios please speak with the Doshii team.